Cleaning & Care
How to Replace Bathtub and Shower Caulk
Learn how to replace bathtub caulk step by step: remove old caulk, prep the surface, and apply a fresh bead that keeps water out for years.
Fresh caulk is one of the cheapest repairs in a bathroom, and one of the most neglected. A bead that took 20 minutes to put in can keep water out of the wall cavity for years. When it starts cracking, peeling, or turning black with mold, the seal is gone, and water finds its way behind the tile or under the tub flange. Replacing it takes a free afternoon and about $10 in materials.
This guide walks through every step: spotting the signs that it's time to recaulk, pulling out the old material cleanly, picking the right product, and laying a new bead that looks tidy and holds up.
When Caulk Needs to Go
Not all caulk problems look the same. Some are obvious; others are easy to dismiss until the damage is done.
Signs it's time to replace bathtub caulk:
- Visible cracks or gaps, even hairline ones
- Caulk that pulls away from the tub or tile along one edge
- Persistent pink or black discoloration that bleeds through cleaning
- A soft or spongy feel when you press the bead
- Any spot where you can see daylight or feel air movement behind the joint
Discoloration alone is worth paying attention to. Surface mildew wipes off; staining that's inside the caulk or directly under it usually means the seal has broken and moisture is sitting there. You can try scrubbing, but if the color comes back within a few weeks, the caulk needs to come out. See our guide to removing bathroom mold and mildew safely for cleaning steps before you recaulk.
Tools and Materials You'll Need
There's no specialized equipment here. Most of this is already in a basic tool kit.
For removal:
- Utility knife or caulk removal tool (a hooked blade made for this)
- Plastic scraper or old credit card
- Caulk remover gel (optional but helpful on thick old beads)
- Isopropyl alcohol (70% or higher) or denatured alcohol
- Clean rags or paper towels
For application:
- Silicone caulk with mildewcide, or a siliconized latex caulk rated for wet areas
- Caulk gun (a basic squeeze tube works for small jobs)
- Painter's tape (low-tack)
- A small bucket of warm water
- Dish soap (a few drops)
- Your fingertip or a caulk smoothing tool
Plan to leave the tub and shower unused for at least 24 hours after you finish, ideally 48. Block the drain and leave a note if other people in the house might forget.
How to Remove Old Caulk
This step takes patience. Rushing it leaves residue that stops new caulk from bonding, which is the main reason recaulking jobs fail within a year.
Softening the Caulk
If the old bead is thin and already peeling, you may be able to skip to scraping. For thick, intact beads, apply a caulk remover gel (products containing methylene chloride work faster; citrus-based options take longer but are less harsh). Spread it over the caulk, cover loosely with plastic wrap to slow evaporation, and wait 2 to 4 hours. The bead will soften and pull away more easily.
Scraping and Pulling
Score along both edges of the bead with a utility knife, keeping the blade as flat as possible to avoid scratching the tub or tile. Then grip one end of the loosened bead and pull steadily. It often comes off in a long strip when the scoring is clean.
Use a plastic scraper to lift any remaining chunks. Metal scrapers work, but they scratch acrylic and fiberglass tubs, so keep a plastic tool on hand for those surfaces. On porcelain or ceramic tile, a metal blade is fine.
Cleaning the Joint
This is the step most people cut short. Any silicone residue left behind acts as a release agent and prevents the new caulk from sticking.
Wipe the joint with isopropyl alcohol on a clean rag. If you see white or translucent smears, that's silicone residue. Keep wiping with fresh sections of rag until the cloth comes away clean. Let the joint dry completely, at least 30 minutes, before moving on. If you're working in a tub surround with grout lines nearby, this is a good point to clean the grout so you're working with a fully clean surface.
Choosing the Best Caulk for a Bathroom
The product you pick matters more than the technique for long-term performance.
Silicone vs. Siliconized Latex
100% silicone is the most durable option for the tub-to-tile joint and the base of the shower. It flexes without cracking as the tub shifts slightly under weight, which is the main reason caulk fails in the first place. It's harder to smooth, takes longer to cure (24 to 48 hours), and requires mineral spirits or acetone for cleanup. It also must be applied to a bone-dry surface.
Siliconized latex (sometimes sold as "acrylic latex with silicone") is easier to work with and cleans up with water. It's a reasonable choice for lower-movement joints like around a vanity backsplash, but it doesn't last as long in a tub or shower that sees daily use and constant flexing.
For the tub surround and shower base, use silicone. For everything else, siliconized latex works fine.
Color and Mildewcide
White and almond cover most installs. If your grout is a different color, some brands offer a wider range, but matching caulk to grout color is difficult and rarely looks better than just using white.
Choose a product that lists mildewcide (or "antimicrobial protection") on the label. It won't prevent mold indefinitely, but it slows the process and extends how long the bead looks clean.
Applying New Caulk
Taping the Joint
Run two strips of painter's tape parallel to the joint, leaving the gap exposed. The tape width controls the bead width; a gap of 3/16 to 1/4 inch is typical for a tub-to-tile joint. Narrower than that and the caulk is too thin to seal well; wider and it looks bulky and takes longer to cure.
Fill the tub with water before you caulk if it's an alcove or freestanding tub that rests on the subfloor. The weight causes the tub to settle a few millimeters, opening the joint slightly. Caulking with the tub full means the bead cures at the widest the joint will be. When the tub drains, the joint tightens rather than pulling the caulk loose.
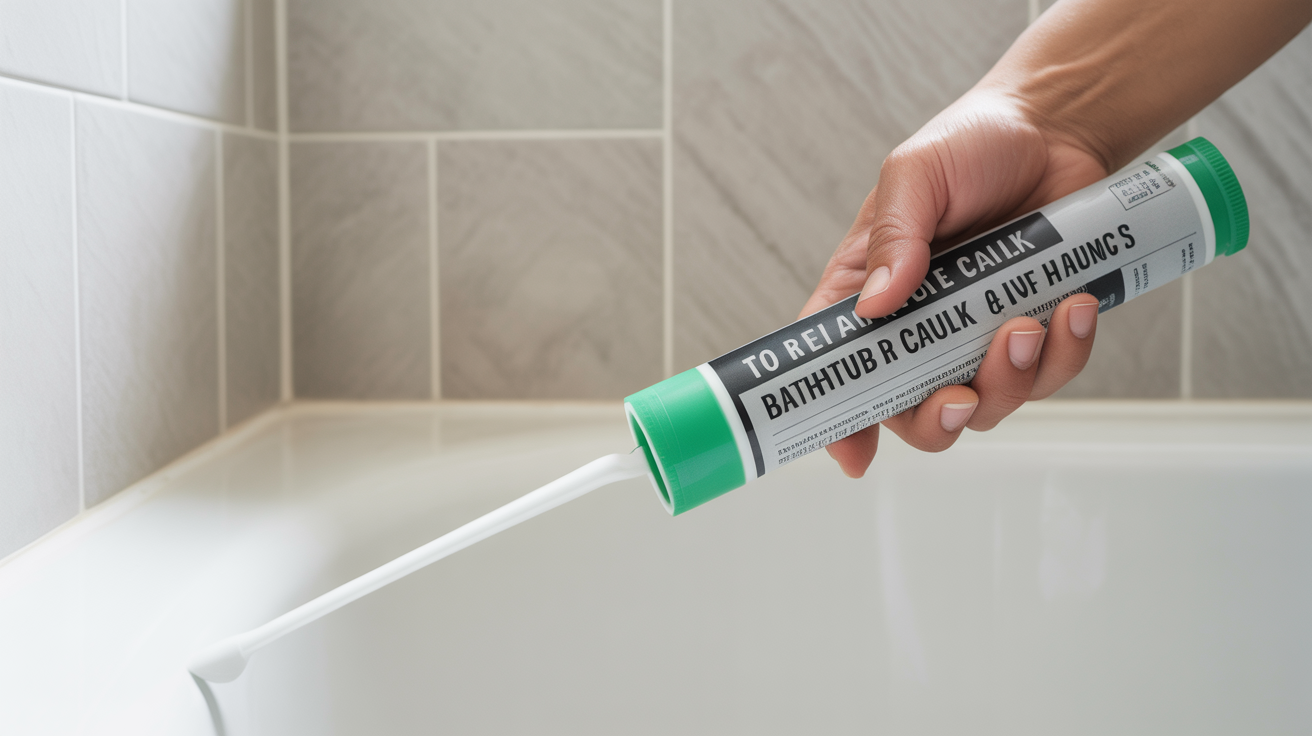
Cutting the Tip and Loading the Gun
Cut the nozzle at a 45-degree angle, about 3/16 inch from the tip. Smaller is better; you can always run a second pass, but excess caulk is messier to smooth. If you're using a caulk gun, pierce the inner foil seal with a long nail or the built-in puncture tool.
Running the Bead
Hold the gun at roughly 45 degrees to the joint. Move at a steady pace, keeping consistent pressure. If caulk is stacking up, you're going too slowly. If the bead is thin and spotty, slow down or increase pressure. Try to run the full length of a wall in one pass without stopping.
Smoothing
Mix a small amount of dish soap into warm water (just a few drops). Dip your fingertip or a caulk tool in the soapy water and drag it along the bead in one smooth stroke. The soap prevents the caulk from sticking to your finger. Press firmly enough to pack the caulk into the joint, not just skim the surface.
Pull the tape immediately while the caulk is still wet, before it skins over. Pulling tape through wet caulk leaves clean edges. Waiting until it's tacky tears the bead.
Let the caulk cure for 24 hours before any water contact. With 100% silicone, waiting 48 hours is better in a frequently-used shower.
Frequently Asked Questions
How long does bathtub caulk last?
A well-applied silicone bead in a regularly-used tub or shower typically holds for 5 to 10 years before cracking. Siliconized latex may need replacement sooner, often around 3 to 5 years. Exposure to harsh cleaners, abrasive scrubbing, and a tub that flexes more than average will shorten that lifespan.
Can I caulk over old caulk?
Not with good results. New caulk won't bond to old caulk reliably, especially to silicone. The layer will peel or crack within months. Removing the old material down to the substrate is worth the extra time.
What if there's a gap wider than 1/4 inch?
For gaps wider than about 3/8 inch, caulk alone won't bridge the joint without sagging or cracking. Pack the gap with backer rod first (a foam cord sold by the foot at hardware stores), then apply caulk over it. The backer rod gives the caulk something to press against and keeps it from being too thick.
How do I keep the new caulk from going moldy?
Ventilation is the biggest factor. Run the exhaust fan during every shower and for at least 15 minutes after. Dry the tub surround and shower walls with a squeegee or towel after each use. Avoid spraying bleach-based cleaners directly onto the caulk line, which degrades the silicone over time. If you notice early pink staining, a diluted white vinegar wipe-down a couple of times per week slows the progression.
Do I need to seal caulk after applying it?
No. Caulk is itself a sealant. Applying additional products over it is unnecessary and can interfere with curing. The surface is ready for normal use once the manufacturer's stated cure time has passed.