Tile & Flooring
How to Tile a Shower Wall: A Step-by-Step Guide
Learn how to tile a shower wall the right way — waterproofing, layout, thinset, setting tile, grouting, and sealing explained step by step.
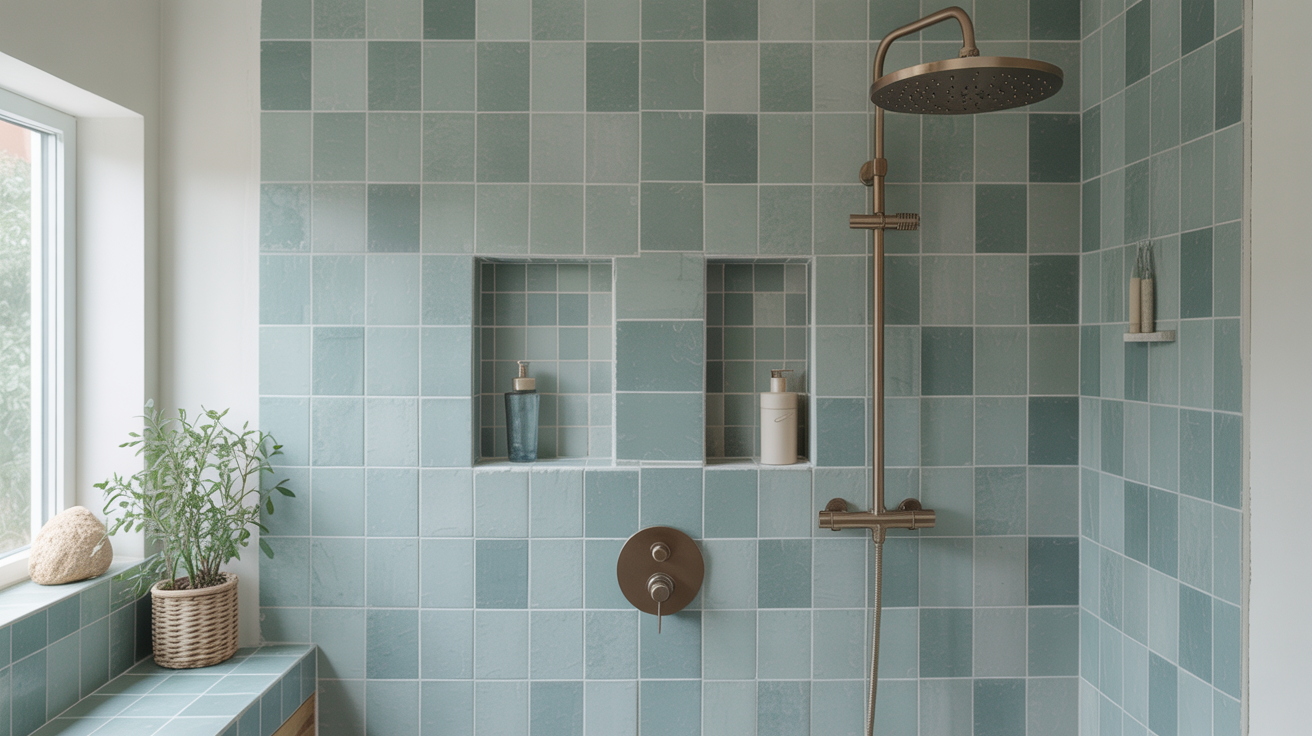
Tiling a shower wall is one of the more satisfying bathroom projects you can tackle yourself, and it's entirely doable with careful prep and the right materials. The work breaks down into four phases: waterproofing the substrate, laying out the tile, setting it, and finishing with grout and sealer.
What You'll Need
Getting everything on site before you start saves a lot of trips to the hardware store. Below is a practical list for a standard 3-wall shower alcove.
Tools
- Notched trowel (1/4" × 3/8" V-notch for wall tiles up to 6"; 1/2" × 1/2" square-notch for large-format 12"+ tiles)
- Grout float
- Rubber mallet
- Level (48" preferred)
- Tile wet saw or angle grinder with diamond blade
- Drill with mixing paddle
- Bucket, margin trowel, sponges
- Tape measure, pencil, chalk line
Materials
- Cement backer board (1/2" for walls) or a sheet membrane system
- Alkali-resistant mesh tape and backer board screws
- Liquid waterproofing membrane or sheet membrane kit
- Modified polymer thinset mortar (gray for dark grout, white for light)
- Tile spacers (2 mm or 3 mm depending on your grout joint preference)
- Grout, unsanded for joints under 1/8", sanded for wider joints
- Silicone caulk matched to grout color for corners and changes in plane
- Tile and field cut pieces
- Grout sealer (penetrating, not topical)
Tile count: measure the square footage of each wall, add 10% for cuts and breakage, and 15% for diagonal patterns. For layout ideas that affect how many cuts you'll need, see our guide on subway tile patterns and layout options.
Waterproofing and Substrate Prep
This is the step most DIY shower tile installations get wrong, and it's the one that causes the most damage when skipped. Water will get behind your tile. The question is whether it has somewhere safe to go or whether it soaks into drywall and framing.
Remove Existing Material
Strip back to the studs. Standard drywall, even moisture-resistant "green board", is not appropriate behind shower tile. It will fail.
Install Cement Backer Board
Cut 1/2" cement board with a scoring knife and snap, or use a jigsaw with a carbide blade. Fasten it with 1-5/8" backer board screws on 6" centers along studs and 8" in the field. Leave a 1/8" gap between sheets and at the tub deck or shower pan; this gets filled with silicone later, not thinset. Tape all seams with alkali-resistant mesh tape embedded in a thin layer of thinset, let it cure overnight.
Apply Waterproofing
Brush or roll two coats of a liquid membrane (RedGard, Laticrete Hydro Ban, or similar) over the entire backer board surface. Pay extra attention to corners, seams, screw heads, and any penetrations (pipe stubs, niches). Let each coat dry fully, the membrane changes from pink to red as it dries. Total thickness should be at least 30 mils; most manufacturers print a coverage chart on the bucket. A sheet membrane (Schluter Kerdi, Wedi) is an equally valid option and integrates neatly with prefab corners and niches.
Do not skip or shorten this step. Waterproofing behind tile is not optional.
Layout and Ledger Board
A good layout prevents tiny slivers at outside corners and keeps horizontal lines level even when the tub deck or shower pan is not.
Measure the width of each wall and find the center. Snap a vertical chalk line at center. Then hold a row of tiles (with spacers) against this line and see where the cuts fall at each end. If you'd end up with a cut smaller than half a tile at one corner, shift the layout by half a tile width. Aim for balanced, equal cuts on both sides.
For the horizontal, set your level on the tub deck or shower base at its highest point. Mark a line 1 tile height + 1/8" above that point and tack a straight 1×4 ledger board along this line across all three walls. You'll tile down to the pan last, once the wall field is done and cured.
If you want to think through your overall tile choice before locking in a layout, our article on how to choose bathroom floor tile that lasts covers slip ratings, finish types, and sizing in detail.
Setting the Tile
Mix and Apply Thinset
Use a modified polymer thinset mixed to a peanut butter consistency, it should hold a notch without slumping. Mix only what you can use in 30 minutes; the open time shortens fast in warm rooms.
Spread thinset with the flat side of the trowel first, then comb it with the notched side held at a consistent 45-degree angle. For standard 4"×4" or 3"×6" subway tile, a 1/4" × 3/8" V-notch trowel is the standard call. For 12"×24" or larger large-format tile, step up to a 1/2" × 1/2" square-notch and back-butter each tile as well to eliminate voids, any void over 2" in a wet area risks cracking the tile or trapping moisture.
Set and Check Coverage
Press each tile with a slight twisting motion and tap lightly with a rubber mallet. Pull a tile off every 10–15 minutes and check the back: you want 95% or better thinset transfer coverage in a wet area. Bare spots or ridges mean you need to adjust your technique or trowel size.
Work in sections no larger than 3–4 square feet at a time to keep the thinset from skinning over before you set the tile.
Use plastic spacers consistently. Even if you plan on tight grout joints, spacers keep lines honest over a long run.
Cuts and Niches
Score and snap with a manual cutter for straight cuts on smaller tiles. A wet saw is necessary for L-cuts, niche edges, and anything large-format. Wear eye protection and hearing protection, wet saws are loud.
For inside corners, always caulk rather than grout. The corner is a change of plane and a flex point; grout will crack there within a year.
Cure Time, Grouting, and Sealing
Cure
Allow thinset to cure for at least 24 hours before grouting, 48 hours is safer in a cold or humid space. Do not walk on floor tile or apply pressure to wall tiles during this window.
Mix and Apply Grout
Mix grout to a thick, lump-free consistency (similar to smooth mashed potatoes). Use unsanded grout for joints under 1/8"; sanded for anything wider, including the 3 mm joints common with large-format tile. Work in 3–4 square foot sections, pushing grout diagonally across the joints with the float held at about 45 degrees.
Let the grout set 15–20 minutes, then haze-clean with a barely damp sponge. Wring the sponge almost dry, excess water weakens grout joints. Rinse and repeat until the haze is gone. A final buff with a dry cloth pulls the remaining film.
Allow grout to cure 72 hours minimum before exposing the shower to water. Many manufacturers recommend a full 7-day cure before first use.
Seal Grout and Stone
Cement-based grout is porous. Apply a penetrating grout sealer once curing is complete, following the product's dwell and wipe instructions. If you used natural stone or unglazed tile, seal the tile face as well. Reapply sealer annually or whenever water stops beading on the grout surface.
Silicone caulk all corners, changes in plane, and the joint where wall tile meets the shower pan, anywhere two surfaces meet. This is maintenance-critical; replace cracked or peeling caulk promptly.
For a broader look at how tile performs in wet areas compared to other flooring types, see best flooring for bathrooms and what to avoid.
Frequently Asked Questions
Do I really need backer board, or can I tile over drywall?
Standard drywall and even moisture-resistant drywall will absorb water vapor and eventually fail behind shower tile. Cement backer board, fiber cement, or a foam board system (like Wedi) is required in a wet area. Some foam board systems double as the waterproof membrane and skip the liquid membrane step. Check the manufacturer's documentation and your local building code.
How do I know if my waterproofing is thick enough?
Most liquid membranes are red or pink and turn a solid, deeper red when fully cured. Coverage is specified by the manufacturer in square feet per gallon; two full coats applied as directed should reach the required mil thickness. If you can still see the texture of the backer board through the membrane after two coats, apply a third.
What size spacers should I use?
For subway tile (3"×6"), 2 mm spacers give a tight, modern joint. For larger tile (12"×24"), 3 mm is more practical and hides minor variation in tile size. Rectified tile (machine-cut to precise dimensions) can go tighter than non-rectified tile; check the manufacturer's recommendation.
Can I tile over an existing tile shower?
Sometimes. The existing tile must be fully bonded (tap each tile, a hollow sound means it's delaminating), the surface must be flat to within 1/8" over 10 feet, and the added weight and thickness must work with your plumbing trim. This approach also skips the waterproofing layer, so any failure in the original membrane propagates. Removing to the studs and starting fresh is slower but gives you a known-good substrate.
How long before I can use the shower after tiling?
Thinset needs 24–48 hours to cure before grouting. Grout needs 72 hours minimum before water exposure, and many manufacturers call for 7 days before the first full shower. If you used a penetrating sealer on the grout, that adds another hour or two of drying time. Rushing any of these windows can compromise the bond or weaken the grout. Plan for roughly 10 days total from the day you set the last tile to the first shower.
When should I call a professional?
Any time the scope touches plumbing (moving drain locations, adding a valve), structural framing, or electrical (exhaust fan, GFCI circuits), bring in a licensed contractor. Waterproofing a curbless shower, tiling a steam shower, or working with large-format porcelain slabs over 24" also benefits from professional experience, the margin for error is small and the cost of a failed installation is high. This guide covers a standard alcove shower; conditions vary, and local codes take precedence over any general guide.